Guide for creation of OS Image Windows 10 22H2
Article ID: 371757
Updated On:
Products
CA Client Automation - IT Client Manager
CA Client Automation
Issue/Introduction
How to create an OS Image for Windows 10 22H2 in Client Automation ?
Environment
Client Automation 14.5 and upper versions
Resolution
Install Windows ADK and Windows PE add-on
1- Download Windows ADK and Windows PE add-on for the Windows ADK from microsoft site :
2- Install Windows ADK
Only "Deployment Tools" feature is needed for Client Automation OSIM
3- Install Windows PE Add-on :
Create WinPE 10 Boot Image
4- Open DSM Explorer and go under Software/Boot and OS Image Library/Wizards/New Boot Image
5- Click Next and select "WINPE10x64"
6- Click Next and give a name to the boot image
7- Click Next and enter the path for ADK Installation folder.
Example :
C:\Program Files (x86)\Windows Kits\10
8- Click Next and Finish
The Boot Image creation process starts. It could take some minutes
9- The creation is successful and the Boot Image appears in "Local Boot Images"
Register WinPE 10 Boot Image
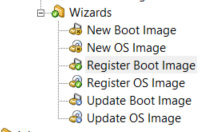
10- Select "Register Boot Image" Wizard :

11- Click Next and select "Register locally created Boot Image" and the Boot Images created before :

12- Click Next and select "Register the image data only" or "Register both the image data and the image package" if you want to create a SD Package to deploy it to a remote Boot Server (on a Scalability Server) :
13- Click Next and Finish. The Boot Image is registered
And it appears in Boot Images list :
Create OS Image for Windows 10 22H2
14- Select "New OS Image" Wizard :
15- In Operating System, select Windows10X64 :

16- Click Next and give a name to the image. Example : WIN10_22H2
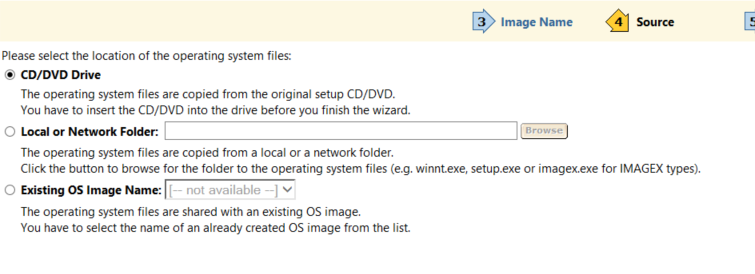
17- Select the Source

18- Click Next and enter the product Key. But this step could be skipped as you could enter the product key later in OSIM Job properties.
19- Click Next and select the code page (by default it is 1252)
20- Click Next and select "Default Response File" (or specify a response file if you have one response file).
21- Click Next and Finish. The creation of OS Image is started and could take some minutes.
22- Image is created and appears in Local OS Images :
Register OS Image
23- Select "Register OS Image" wizards
24- Click Next and select "Register locally created OS Image" and the OS Image created before :
24- Click Next and select "Register the image data only" or "Register both the image data and the image package" if you want to create a SD Package to deploy it to a remote Boot Server (on a Scalability Server) :
25- Click Next, Next and Finish.The OS Image is registered.
26- And the image appears in OS Images list :
Then Machines could be installed using these created Boot and OS Image
Feedback
Yes
No
