Druva Phoenix 4.8 for VMware Cloud on AWS
Article ID: 324700
Updated On:
Products
VMware Cloud on AWS
Issue/Introduction
This article provides information about the architecture, components, deployment, and configuration of Druva Phoenix.
Disclaimer: The partner solution referenced in this article is a solution that is developed and supported by a partner. Use of this product is also governed by the end user license agreement of the partner. You must obtain the application, support, and licensing for using this product from the partner. For more information, contact Druva Support.
Disclaimer: The partner solution referenced in this article is a solution that is developed and supported by a partner. Use of this product is also governed by the end user license agreement of the partner. You must obtain the application, support, and licensing for using this product from the partner. For more information, contact Druva Support.
Resolution
Summary of target use cases, solution architecture, solution components, and support information:

Phoenix includes the Phoenix Cloud and Phoenix backup proxy. Phoenix Cloud is the server component that is hosted on AWS, and is managed by Druva. Phoenix backup proxy is the client component that Phoenix customers deploy on a VMware Cloud host in the AWS Software-Defined Data Center (SDDC) that runs the virtual machines to be backed up. The Phoenix backup proxy communicates with the Phoenix Cloud to initiate scheduled backups and restores. Phoenix Cloud acknowledges the requests and assigns storage for the backed up virtual machines.
Phoenix Cloud
Phoenix Cloud is comprised of the following components:
The Phoenix backup proxy is a virtual machine deployed in the VMware Cloud setup to backup and restore virtual machines. The backup proxy is the client side component that:
To get started with Phoenix, see Phoenix documentation.
Deployment
To backup and restore virtual machines hosted on your VMware Cloud setup, you have to deploy the Phoenix backup proxy. The Phoenix backup proxy is the client side component that detects the virtual machines running on your setup and executes the backup and restores requests from the Phoenix Cloud.
Before you begin, ensure that you download the backup proxy and keep the activation token handy. For more information, see Download backup proxy and generate activation token.
Note: To get the VMware on cloud backup proxy, contact Druva support.
Perform the following steps to deploy the backup proxy:
Before configuring the Phoenix backup proxy, ensure that:
Perform the following steps to configure the deployed Phoenix backup proxy: 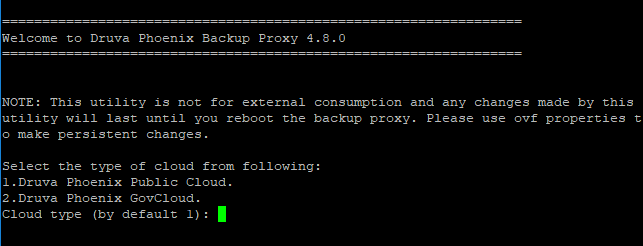

The options in the command line menu are described below:
Perform a standalone activation of backup proxy
If you want to activate the backup proxy at a later stage, use the following steps for activation:
Configuring custom NTP server
You can configure Phoenix VMware backup proxy to use custom NTP server. The NTP requests are serviced through a pool of NTP servers. Currently, the backup proxy uses the *.centos.pool.ntp.org pool.
VMware Cloud on AWS Network configuration
For steps on how to deploy Phoenix backup proxy to backup and restore virtual machines in your environment, see:
Use cases that are supported on VMware Cloud on AWS
The use case addressed in this document is the backup and restore of virtual machines that reside on VMware Cloud on AWS.Use cases that are not supported on VMware Cloud on AWS
File level restores directly to a virtual machine hosted on VMware Cloud on AWS.Solution Architecture
Phoenix includes the Phoenix Cloud and Phoenix backup proxy. Phoenix Cloud is the server component that is hosted on AWS, and is managed by Druva. Phoenix backup proxy is the client component that Phoenix customers deploy on a VMware Cloud host in the AWS Software-Defined Data Center (SDDC) that runs the virtual machines to be backed up. The Phoenix backup proxy communicates with the Phoenix Cloud to initiate scheduled backups and restores. Phoenix Cloud acknowledges the requests and assigns storage for the backed up virtual machines.
Solution Components
Phoenix includes the following components to successfully execute the backup and restore activities.Phoenix Cloud
Phoenix Cloud is comprised of the following components:
- Phoenix Master: Amazon EC2 instances that authorize outgoing and incoming requests to and from the backup proxy, and administrator logins through the Phoenix Management Console.
- Customer Configuration: The Relational Database Service (RDS) that stores customer settings such as backup schedule, retention settings, and auto-configuration rules.
- Storage: The elastic, on-demand S3 storage that stores data backed up from different servers at a dedicated location on the cloud. A single Phoenix setup can be associated with multiple instances of storage. You can purchase multiple instances of storage using credits depending on your data needs and location preferences. It also stores the DynamoDB managed metadata.
- Phoenix Management Console: A web-based, unified console for monitoring the servers, irrespective of the location of the servers. Using this management console, Phoenix administrators can register and configure servers for backup, define backup policy and retention policy, and monitor backup and recovery jobs, activities, and reports.
The Phoenix backup proxy is a virtual machine deployed in the VMware Cloud setup to backup and restore virtual machines. The backup proxy is the client side component that:
- Detects virtual machines on the setup
- Creates virtual machine snapshots for backup
- Executes the backup and restore jobs
To get started with Phoenix, see Phoenix documentation.
Deployment
To backup and restore virtual machines hosted on your VMware Cloud setup, you have to deploy the Phoenix backup proxy. The Phoenix backup proxy is the client side component that detects the virtual machines running on your setup and executes the backup and restores requests from the Phoenix Cloud.
Before you begin, ensure that you download the backup proxy and keep the activation token handy. For more information, see Download backup proxy and generate activation token.
Note: To get the VMware on cloud backup proxy, contact Druva support.
Perform the following steps to deploy the backup proxy:
- Log on to the VMware Cloud vCenter setup. The browser URL is in the following format: https://example-vcenter-ip.vmc.vmware.com
- After logging the vCenter WebSphere client opens on the HTML5 platform.
- On the web client page, click Menu > VMs and Templates.
- In the left pane select the datacenter.
- After you select the data center, click Actions > Deploy OVF Template. A deployment wizard appears.
You can also right-click on the data center and click Deploy OVF Template to launch the deployment wizard.
- In the Select an OVF template section, provide a URL to the OVF template or browse and select the OVF template saved locally on your computer and click Next.
- In the Select a name and folder section, provide a virtual machine name, select a folder on the datacenter, and click Next .
- From the list of resource pools, click the resource pool that you want to assign to this virtual machine, and click Next. You can select provisioning format.
- Thick Provisioned Lazy Zeroed: If you select this format, a thick virtual disk is created, and the existing data is lazy zeroed (existing data on the provisioned storage is cleared when the virtual machine writes to the storage for the first time).
- Thick Provisioned Eager Zeroed: If you select this format, a thick virtual disk is created, and the existing data is eager zeroed (existing data on the provisioned storage is overwritten with zeros at the time of creating the virtual machine).
- Thin Provisioned: If you select this format, a thin virtual disk is created.
- Review the template details and click Next. The details also show the disk provisioning format.
- Accept the End User License Agreement (EULA), and click Next.
- Select a destination storage. From the storage list, click a storage that you want to set as the destination storage for this virtual machine. After selecting the storage, click Next.
Note: Backup proxy uses the default network mapping settings of the vCenter Server.
- Select a network for the backup proxy and click Next.
- Verify the summary, and click Finish.
Before configuring the Phoenix backup proxy, ensure that:
- You have the cloudadmin role credentials for vCenter.
- Port 443 is enabled for http/https traffic
- Traffic from <compute gateway IP> to vCenter server over 443.
- Traffic from <compute gateway IP> to Phoenix master node.
- Traffic from <compute gateway IP> to Phoenix storage node.
Perform the following steps to configure the deployed Phoenix backup proxy:
- Start the backup proxy virtual machine and launch its command line terminal.
- Log in to the backup proxy using the default username and password. The default username is root, and the default password is druvaphoenix.
- When prompted, reset the password.
- On the Welcome screen, select Phoenix Public Cloud.
- On the type of VMware setup page, select VMware on AWS cloud (VMC).
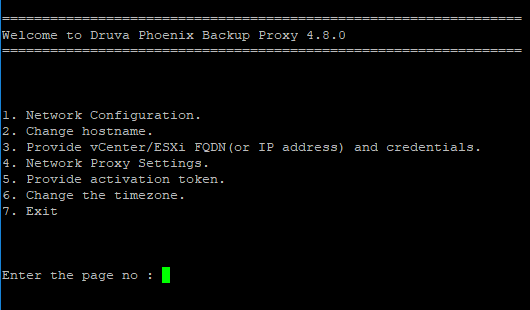
- On the Backup Proxy settings page, enter the required page number and provide the following details:
The options in the command line menu are described below:
| Option | Description |
| Network Configuration | Phoenix backup proxy provides two network interface cards for configuration. When you select a card for configuration, backup proxy provides an option to enable the card. After you enable the card, you can configure the network settings. To configure the network settings (Static/DHCP), if you select the Static IP, provide the following details:
Note: Before selecting DHCP setting, verify that no dhclient is running on the backup proxy. |
| Change hostname | After the network configuration is complete, you can choose to change the CentOS hostname. To change the hostname, you have to provide the new hostname. To leave the hostname unchanged, press Enter. |
| Provide vCenter/ESXi FQDN (or IP address) and credentials ESXi FQDN (or IP address) and credentials | The FQDN or IP address of the vCenter server. |
| Provide activation token | You have to enter the activation token that Phoenix generates when you register the VMware setup. You have to wait till the virtual machine synchronizes with the NTP server. By default, the Phoenix backup proxy synchronizes with the CentOS NTP servers. To configure custom NTP server, see Configuring custom NTP server. Note: If you choose to activate backup proxy at a later time, press Enter key thrice to exit the configuration. To activate backup proxy, follow the steps in To perform a standalone activation of backup proxy. |
| Change the time zone | You can change the timezone on your system:
Note: You can also set the time zone manually. |
| Exit | Wait for the synchronization to complete and exit. |
If you want to activate the backup proxy at a later stage, use the following steps for activation:
- Start the backup proxy virtual machine and launch its command line terminal. Log on to the virtual machine with the default username and the changed password.
- Run the following command to activate backup proxy:
PhoenixActivate <token>
Configuring custom NTP server
You can configure Phoenix VMware backup proxy to use custom NTP server. The NTP requests are serviced through a pool of NTP servers. Currently, the backup proxy uses the *.centos.pool.ntp.org pool.
- Open the /etc/ntp.conf file to configure your NTP server.
- The NTP server configuration file contains NTP server entries in the following format: server <ntp_server_fqdn> [options]
For example:
server 0.centos.pool.ntp.org iburst server 1.centos.pool.ntp.org iburst server 2.centos.pool.ntp.org iburst server 3.centos.pool.ntp.org iburst
- Comment the existing NTP server entries and add the following entry to the /etc/ntp.conf file.
server <internal_ntp_server_fqdn> iburst
- Restart the ntpd service using the following command:
service ntpd restart
- Verify that the /var/log/messages file now synchronizes with the new NTP server without any errors.
VMware Cloud on AWS Network configuration
- You have the cloudadmin role credentials for vCenter Server.
- Port 443 is enabled for http/https traffic
- Traffic from <compute gateway IP> to vCenter server over 443.
- Traffic from <compute gateway IP> to Phoenix master node.
- Traffic from <compute gateway IP> to Phoenix storage node.
Additional resources
For detailed VMware specific documentation, see Backup and Restore VMware Virtual Machines. For Druva Phoenix system requirements, see System Requirements.For steps on how to deploy Phoenix backup proxy to backup and restore virtual machines in your environment, see:
Additional Information
- Recommended architecture: Register VMware on AWS cloud (AWS) setup
- Customer Requirements (Networking, firewalls, vCenter access, ENI access): Register VMware on AWS cloud (AWS) setup
- Supported and unsupported use cases: Limitations doc
- Known issues: Known issues doc, VMware errors, FLR errors
- VMware Cloud on AWS vSAN Advisory
- Support information Troubleshooting (logs, procedures and techniques)
- Link to Product documentation, and specific reference points
- Link to downloads site
- Link to steps to collect partner SVM logs
- Support Process, SLA and Escalation Process
- Contact information
- Error codes
Feedback
Yes
No
Powered by
