RabbitMQ: PerfTest with SSL/TLS
Article ID: 293157
Updated On:
Products
VMware RabbitMQ
Issue/Introduction
Customer want to know how to use the RabbitMQ PerfTest with SSL/TLS.
Resolution
Below is the general steps how to configure the perftest with SSL/TLS.
1. Installed the RabbitMQ and make sure it is running.
2.1 Download the script from the git and go to the newly create directory.
7. You can also see the SSL/TLS handshake in the tcpdump log. You can collect the tcpdump by the below command:
1. Installed the RabbitMQ and make sure it is running.
root@worker1:~# rabbitmqctl version
3.10.5
root@worker1:~# systemctl status rabbitmq-server.service
● rabbitmq-server.service - RabbitMQ broker
   Loaded: loaded (/lib/systemd/system/rabbitmq-server.service; enabled; vendor preset: enabled)
   Active: active (running) since Mon 2022-06-13 00:21:30 UTC; 6h ago
  Process: 16677 ExecStop=/usr/lib/rabbitmq/bin/rabbitmqctl shutdown (code=exited, status=0/SUCCESS)
 Main PID: 16840 (beam.smp)
    Tasks: 24
   Memory: 80.0M
      CPU: 2min 46.931s
   CGroup: /system.slice/rabbitmq-server.service
           ├─16840 /usr/lib/erlang/erts-12.3.1/bin/beam.smp -W w -MBas ageffcbf -MHas ageffcbf -MBlmbcs 512 -MHlmbcs 512 -MMmcs 30 -P 1048576 -t 5000000 -stbt db -zdbbl 128000 -sbwt none -sbwtdcpu none -sbwtdio none -- -root /usr/lib/erlang -p
           ├─16863 erl_child_setup 32768
           ├─16890 /usr/lib/erlang/erts-12.3.1/bin/epmd -daemon
           ├─16913 inet_gethost 4
           └─16914 inet_gethost 4

Warning: Journal has been rotated since unit was started. Log output is incomplete or unavailable.
root@worker1:~#
2. Generated the CA certificate.
2.1 Download the script from the git and go to the newly create directory.
git clone https://github.com/chunvmware/ssl.git
cd ssl
2.2 In the ssl directory, you will see setup_ca.sh etc. and run below commands.
sh setup_ca.sh {your-ca-file-name}
sh make_server_cert.sh {your-hostname} {passwd}
sh create_client_cert.sh {your-client-name} {passwd}
It will create ca, server, client directory respectively.
2.3 Copy the ca and server directory to /etc/rabbitmq/ssl.
ssl_options.cacertfile=/etc/rabbitmq/ssl/ca/cacert.pem
ssl_options.certfile=/etc/rabbitmq/ssl/server/ubuntu2.cert.pem
ssl_options.keyfile=/etc/rabbitmq/ssl/server/ubuntu2.key.pem
listeners.ssl.default=5671
ssl_options.fail_if_no_peer_cert = false
ssl_options.verify = verify_none

ssl_options.versions.1=tlsv1.2
ssl_options.versions.2=tlsv1.1

ssl_options.ciphers.1 = ECDHE-ECDSA-AES256-GCM-SHA384
ssl_options.ciphers.2 = ECDHE-RSA-AES256-GCM-SHA384
ssl_options.ciphers.3 = ECDHE-ECDSA-AES256-SHA384
ssl_options.ciphers.4 = ECDHE-RSA-AES256-SHA384
ssl_options.ciphers.5 = ECDHE-ECDSA-DES-CBC3-SHA
ssl_options.ciphers.6 = ECDH-ECDSA-AES256-GCM-SHA384
ssl_options.ciphers.7 = ECDH-RSA-AES256-GCM-SHA384
ssl_options.ciphers.8 = ECDH-ECDSA-AES256-SHA384
ssl_options.ciphers.9 = ECDH-RSA-AES256-SHA384
ssl_options.ciphers.10 = DHE-DSS-AES256-GCM-SHA384
ssl_options.ciphers.11= DHE-DSS-AES256-SHA256
ssl_options.ciphers.12 = AES256-GCM-SHA384
ssl_options.ciphers.13 = AES256-SHA256
ssl_options.ciphers.14 = ECDHE-ECDSA-AES128-GCM-SHA256
ssl_options.ciphers.15 = ECDHE-RSA-AES128-GCM-SHA256
ssl_options.ciphers.16 = ECDHE-ECDSA-AES128-SHA256
ssl_options.ciphers.17 = ECDHE-RSA-AES128-SHA256
ssl_options.ciphers.18 = ECDH-ECDSA-AES128-GCM-SHA256
ssl_options.ciphers.19= ECDH-RSA-AES128-GCM-SHA256
ssl_options.ciphers.20 = ECDH-ECDSA-AES128-SHA256
ssl_options.ciphers.21 = ECDH-RSA-AES128-SHA256
ssl_options.ciphers.22 = DHE-DSS-AES128-GCM-SHA256
ssl_options.ciphers.23 = DHE-DSS-AES128-SHA256
ssl_options.ciphers.24 = AES128-GCM-SHA256
ssl_options.ciphers.25 = AES128-SHA256
ssl_options.ciphers.26 = ECDHE-ECDSA-AES256-SHA
ssl_options.ciphers.27 = ECDHE-RSA-AES256-SHA
ssl_options.ciphers.28 = DHE-DSS-AES256-SHA
ssl_options.ciphers.29 = ECDH-ECDSA-AES256-SHA
ssl_options.ciphers.30 = ECDH-RSA-AES256-SHA
ssl_options.ciphers.31= AES256-SHA
ssl_options.ciphers.32 = ECDHE-ECDSA-AES128-SHA
ssl_options.ciphers.33 = ECDHE-RSA-AES128-SHA
ssl_options.ciphers.34 = DHE-DSS-AES128-SHA
ssl_options.ciphers.35 = DHE-DSS-AES128-SHA256
ssl_options.ciphers.36 = ECDH-ECDSA-AES128-SHA
ssl_options.ciphers.37 = ECDH-RSA-AES128-SHA
ssl_options.ciphers.38 = AES128-SHA
4. Restarted the RabbitMQ service with below command:
systemctl restart rabbitmq-server.service5. Installed the RabbitMQ Perftest with following commands:
wget https://github.com/rabbitmq/rabbitmq-perf-test/releases/download/v2.17.0/rabbitmq-perf-test-2.17.0-bin.tar.gz
tar -xzvf rabbitmq-perf-test-2.17.0-bin.tar.gz
6. Did the PerfTest with SSL.
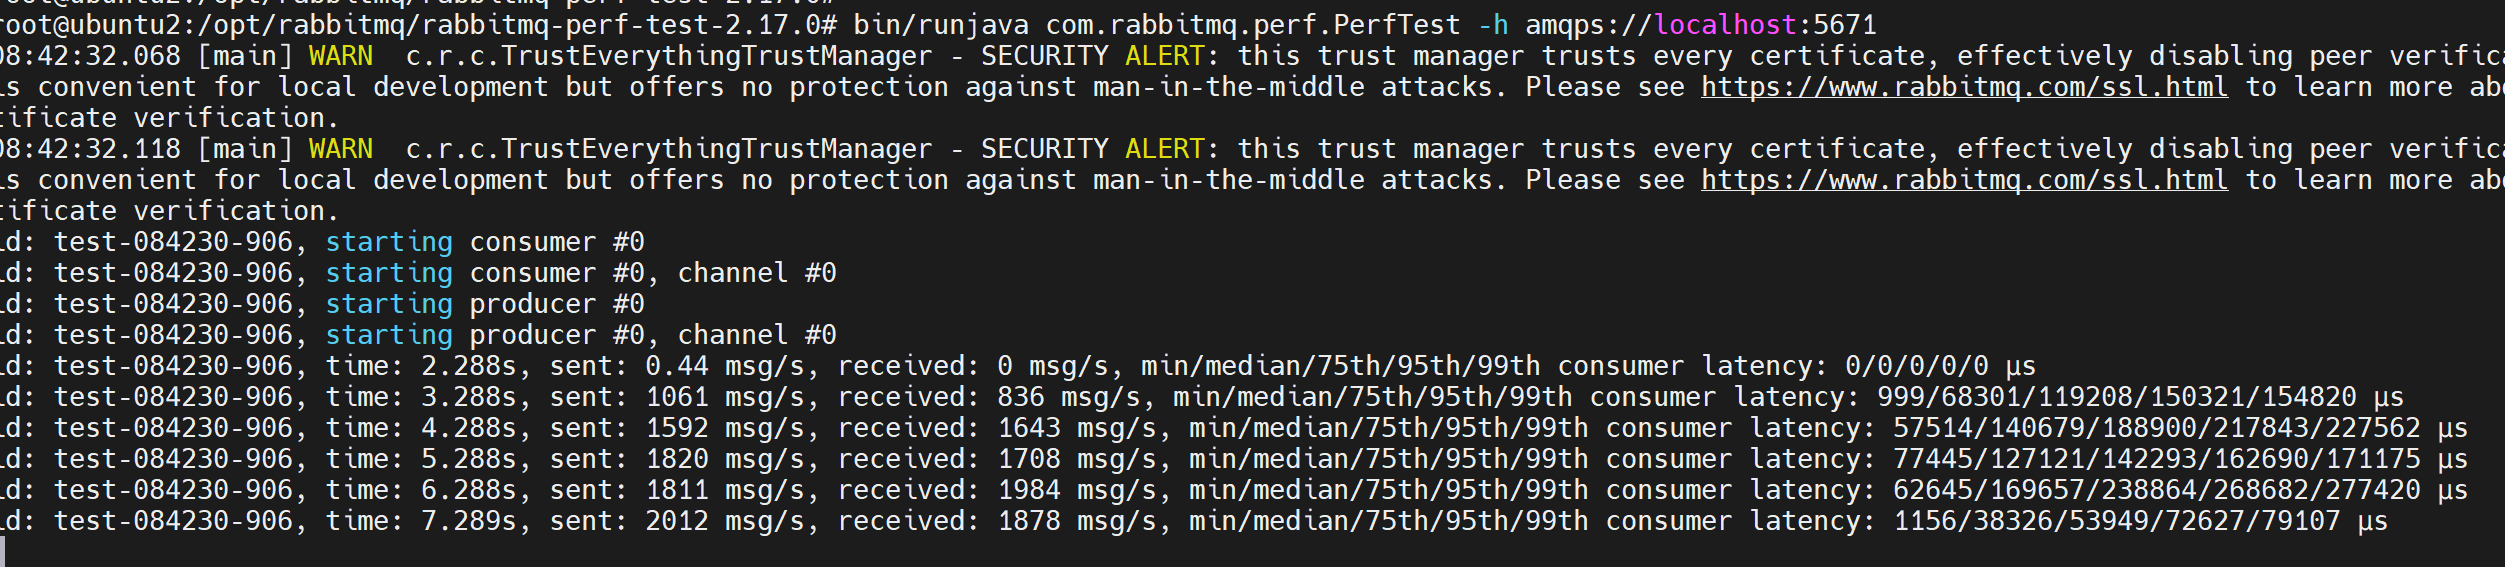
cd rabbitmq-perf-test-2.17.0
bin/runjava com.rabbitmq.perf.PerfTest -h amqps://localhost:5671
From below screenshot, you can see the PerfTest is working well.
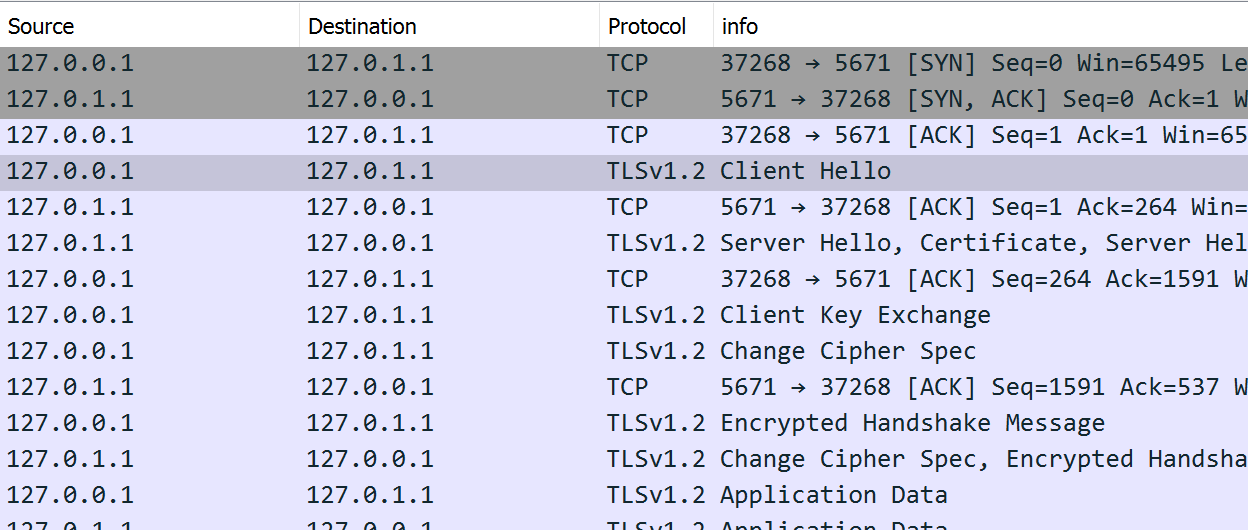
7. You can also see the SSL/TLS handshake in the tcpdump log. You can collect the tcpdump by the below command:
tcpdump -i any port 5671 -w /tmp/5671.pcap8. Once you open the tcpdump capture file by some tools such as Wireshark, you may see SSL/TLS handshake dump like the below:
Feedback
Yes
No
Powered by
