Step-by-step: Configure a Cisco ASA (v9.1) to connect to the Cloud
Article ID: 171206
Updated On:
Products
Cloud Secure Web Gateway - Cloud SWG
Issue/Introduction
How do I configure a Cisco ASA device (version 9.1.1) to send IPsec traffic to the Cloud?
How do I configure an ASA to send only one (1) workstation to the Cloud...for testing purposes?
Resolution
As of the writing of this knowledge base article (Feb 2013), we are using the most current versions of ASA and ASDM:
- Cisco ASA version: 9.1(1)
- ASDM version: 7.1(1)52
GOTO: Configuration > Site-to-Site VPN > Connection Profiles
Make sure that the following checkbox is ENABLED:
"Enable inbound VPN sessions to bypass interface access lists..."
CREATE a Site-to-Site Connection Profile:
Click the "Add" button under "Connection Profiles", and the "Add IPsec Site-to-Site Connection Profile" dialog opens.
In the "Basic" section...
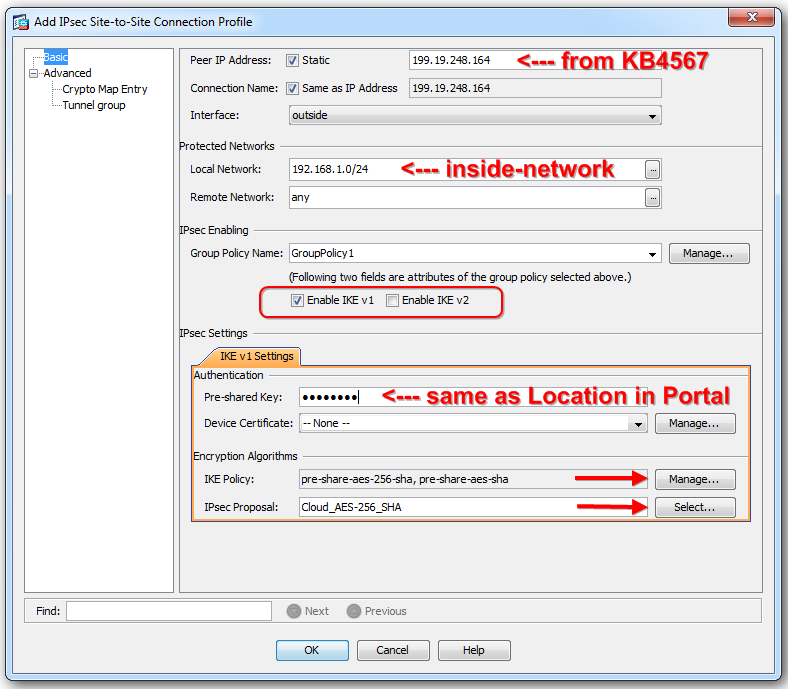
(Peer IP Address) Refer to the following KB for the "Peer IP Address" box:
000014776: What are the IP addresses used to connect via IPsec to the Threatpulse Cloud?
In this example, we will select the IP address for the Sunnyvale location: 199.19.248.164
(Local Network) inside-network
(Remote Network) any
IKE v1 Settings > Authentication (Pre-shared Key)
This value should match the PSK value you've configured in your "Location" in your Customer Portal.
IKE v1 Settings > Encryption Algorithms (IKE Policy)
NOTE: make sure that the following recommended IKE Policy values have a high (top-level) priority, or manage them as follows...
Click the "Manage..." button
Recommended IKE Policy values are:
pre-share-aes-256-sha
pre-share-aes-sha
IKE v1 Settings > Encryption Algorithms (IPsec Proposal)
Click the "Select..." button
For the IPsec Proposal (Transform Set), the recommended settings are:
Mode->Tunnel
ESP Encryption: AES-256
ESP Authentication: SHA
Remain in the "Add IPsec Site-to-Site Connection Profile" dialog, and click on the "Advanced->Crypto Map Entry" section:
Perfect Forward Secrecy: Enable
Diffie-Hellman Group: group5
NAT-T: Disable
Your new "Connection Profile" should look similar to:
====================
GOTO: Configuration > Site-to-Site VPN > Advanced > Crypto Maps
...and the following Crypto Map will have appeared (if not, click Add to create one):
Edit this Crypto Map, and on the "Tunnel Policy (Crypto Map) - Basic" tab, the values should have been automatically copied here. Verify their values:
On the "Traffic Selection" tab, edit the "Service" field to be: tcp/http, tcp/https
Your completed Crypto Map should look like:
====================
GOTO: Configuration > Site-to-Site VPN > Advanced > Certificate to Connection Profile Maps > Policy
Make sure the "Use the configured rules to match a certificate to a Connection Profile" is DISABLED:
====================
GOTO: Configuration > Firewall > NAT Rules
Create the Firewall NAT Rules.
Click Add, and then select Add NAT Rule Before "Network Object" NAT Rules...
Source Interface: inside
Destination Interface: outside
Source Address:
- set to one (1) IP address to send one workstation into the Cloud tunnel (for testing), or
- set to "any" to send all internal traffic
Service: set to "tcp/HTTP" (you might have to create a new Service Object) Note: When creating or using existing service object verify source port is defualt (1-65535) for both http and https.
...and now repeat the same steps above (Add a new NAT Rule) for the "tcp/HTTPS" service:
Your completed NAT Rules should look similar to:
====================
TEST to see if you are now protected by the Cloud service.
Open a browser and go to: http://test.threatpulse.com
This will show if your computer is protected by the Cloud (or not), and what Cloud DataPod you are connected to.
====================
GOTO: Monitoring > VPN > VPN Statistics > Sessions
In the "Monitoring" section in ASDM, verify that the IPsec Site-to-Site VPN tunnel is established:
Feedback
Yes
No
Powered by
